

In today's world of technology, it is becoming more and more necessary and convenient to manage various processes from our phones and tablets. The vSphere Mobile Client allows system administrators to monitor the vSphere vCenter infrastructure directly from the mobile device.
Several years ago, we looked at one of VMWare's products, the alpha version of the vSphere Mobile Client. Let's see what functionality is available in the latest version, as well as how to install the application.
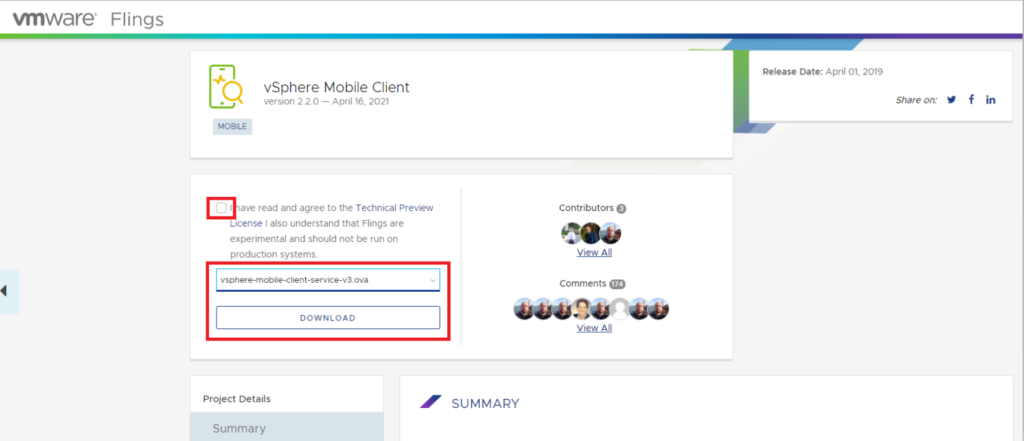
To install the vSphere Mobile Client visit the VMWare Flings page.
To receive notifications about the progress of vSphere vCenter tasks, you need to create a virtual machine that will transfer data to your mobile device, and it is required to install the vSphere Mobile Client application on your mobile device (available for both Android and iOS users) as well. We agree that we are aware that this is an experimental product, so the box in the window shown in the image needs to be checked, then select vsphere-mobile-client-service-v3.ova from the list and click DOWNLOAD.
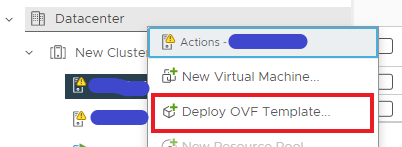
First you need to log in to vCenter, which you want to manage with a mobile client. Choose the host on which to install the VM then choose Deploy OVF Template.
Select the previously downloaded .ova file and complete installation steps according to your infrastructure specification (enter IP addresses, specify a gateway or choose to retrieve network parameters from a DHCP server, etc.).
After successful installation of the virtual machine, it needs to be turned on.

Enter the default user mobile, and the default password vsphere-mobile. Immediately after entering the password, a message appears stating that you need to change the default password to one you have defined. Once we have logged in with the mobile user, we need to open the folder named service:
cd /home/mobile/service
It is necessary to generate a certificate and specify the IP address of the vCenter whose tasks we want to manage and receive notifications about in the application, as well the port through which the application will communicate with the VM, needs to be defined. All this can be done with the cloudsmith configuration tool built into the virtual machine. The port argument is optional (if not specified, the tool selects port 443 by the default, but in our test environment, the service responsible for sending notifications to the mobile application restarted all the time, because port 443 was already used by another service, so we used an alternative port 8080):
java -jar cloudsmith-configuration-service.jar --vcenter {vCenter IP address} --port 8080
You will then need to log in as root user. The default password for this user is vsphere-mobile as well, and you will be prompted to change your password after the first successful login. When the password is changed, port 8080 must be opened for the VM to communicate with the mobile device. To do this, enter the command:
iptables -A INPUT -p tcp --dport 8080 -j ACCEPT
After that you need to turn on the vsphere-mobile service - enter the command:
systemctl enable vsphere-mobile
Finally we need to start this service:
systemctl start vsphere-mobile
If an error message appears when entering any of the commands, log entries can be viewed with the command:
journalctl -u vsphere-mobile -b
The status of the vsphere-mobile service can be checked with the command:
systemctl status vsphere-mobile.service
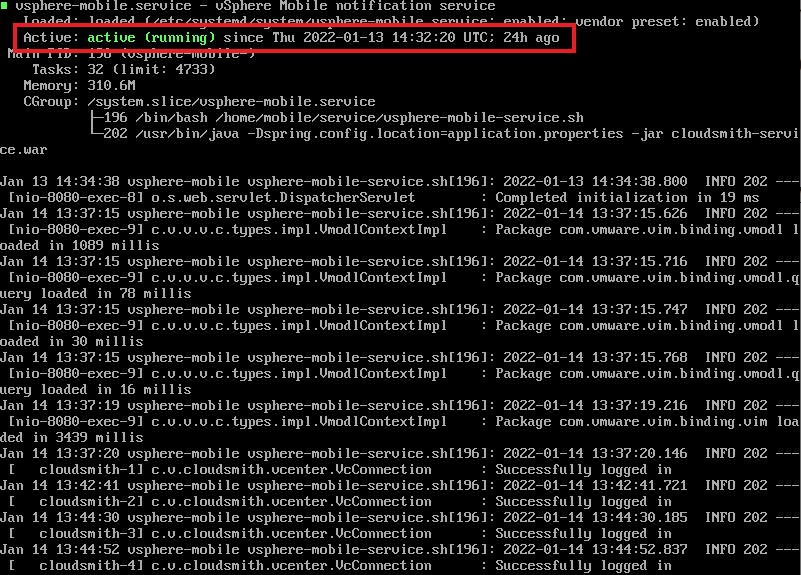
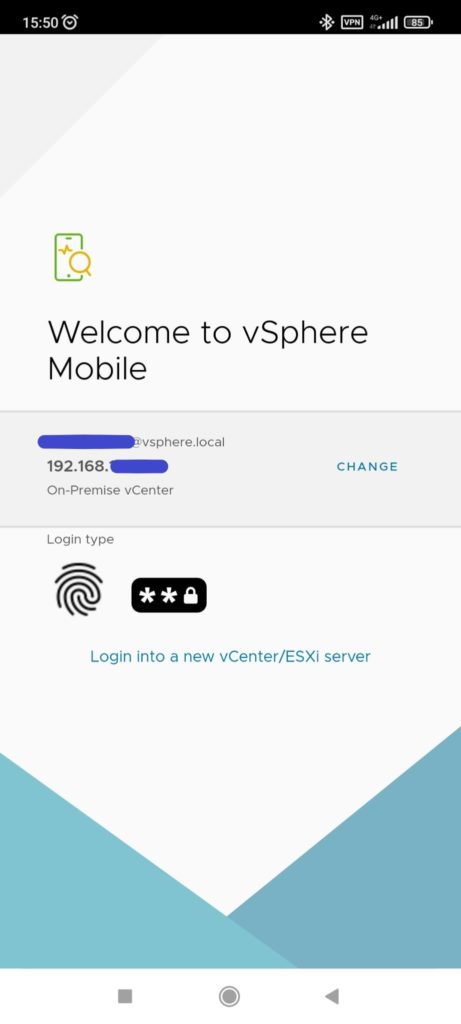
You can see that the status is active, so the service is running and we can go to the Google Play store for Android device users or the App Store for iOS device users and download the application called vSphere Mobile Client. Note - Your phone needs granted access to the network where the vCenter is located in order for the application to connect to the vCenter server. This can be achieved by setting up either a VPN on your phone or by connecting to a WiFi network that provides access to the internal network (depending on each production environment individually). Once the application is installed, we enter the vCenter’s IP address, username and password.
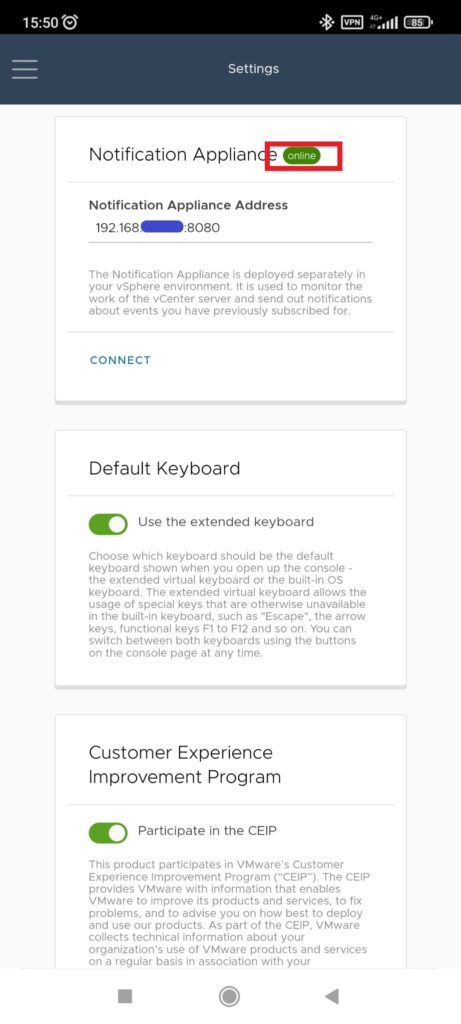
When done with previous steps, go to Settings. Enter the IP address of the newly created VM and specify the port to connect through - in our example 8080. If a green symbol (Online) appears after the Notification Appliance, then we are connected to the created VM and the application will receive notifications for the progress of tasks.
The installation process now is complete. Let's look at the features provided by this application.
In the Dashboard window the consumption of available resources of the server (CPU, Memory, Storage) in relation to the total allocated resources can be seen, the status of hosts in the vCenter, the total number of virtual machines in the vCenter.

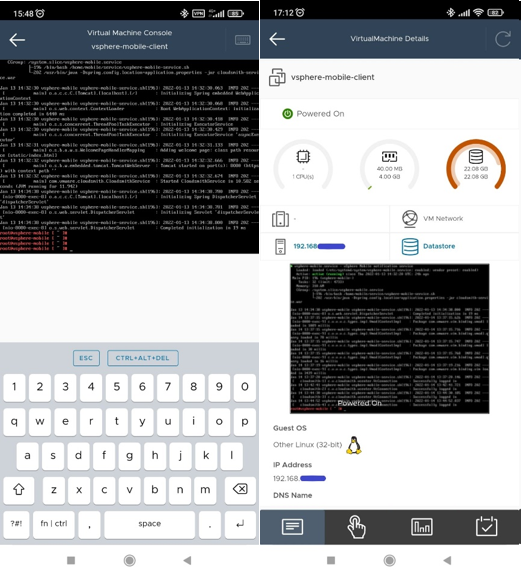
In the VMs & Workloads section, a list of all virtual machines is shown, as well as how much each specific VM uses the resources allocated to it. By clicking on one of the VMs, we can access it’s console and control it through the phone screen, and also transfer the necessary commands with the provided keyboard. Clicking on the palm icon at the bottom of screen takes you to a menu where you can turn on / off / stop the VM, turn off / restart the VM’s OS, and create a snapshot, or return to an already created snapshot. By clicking on the other icons, we see the consumption of resources in different time intervals as well as the history of completed tasks related to this VM.

The Hosts section displays basically the same information as in the previous window for each specific VM, only at the host level. We see all the hosts connected to vCenter, their resource allocation, we can turn on / off the host Maintenance mode, restart or turn off each of the hosts connected to vCenter. We see resource consumption at different time intervals and host’s events, warnings, and errors.
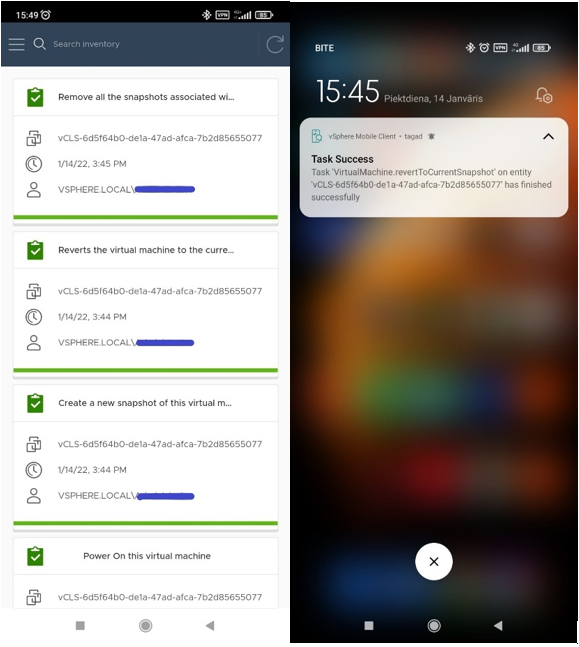
In the Tasks section, we see previously created tasks as well as their statuses. If a task takes longer to complete, a notification will appear on the phone when the task is completed, even if the vSphere Mobile application is not opened on the phone.
According to the latest version, compared to the previous one, iOS device support is now available, authentication of the server with the fingerprint on the mobile device is now available, pop-up notifications on the device about the status of vCenter tasks are available, and, of course, the ability to access and transfer commands to the VM’s console from the mobile application.